L'IPv6 est arrivée !
Il y a quelques jours, j'ai eu une coupure d'Internet d'environ 5h... De quoi râler auprès de son opérateur ! Perturbation générale de tous les clients. Il vaut mieux que soit ainsi plutôt qu'un incident isolé, potentiellement long à résoudre. Une fois Internet reconnecté, quel plaisir de voir dans l'interface de la box une adresse IPv6 ! Après quelques soucis de configuration réseau, tous les services sont désormais joignables via cet adressage !
Qu'est-ce qu'IPv6 ?
C'est une bonne question, car en général on veut simplement que notre connexion internet fonctionne sans avoir à tripatouiller les tréfonds de la configuration réseau. IPv6 est le "successeur" d'IPv4. Il a été spécifié en 1998 et normalisé en 2017. L'objectif est de dépasser les limitations actuelles des fameuses adresses "IP" (Internet Protocol). Cette adresse est attribuée de façon statique (toujours la même) ou dynamique aux appareils qui se connectent à un réseau ethernet (dont Internet). Elle permet le routage du trafic réseau. Au quotidien, nous ne manipulons pas directement ces adresses, mais plutôt des identifiants textuels (l'adresse d'un site web) pour naviguer. Ces identifiants sont traduits automatiquement en adresses IP par les serveurs DNS (Domain Name Server). La gestion mondiale des adresses est confiée à la société américaine (à but non lucratif) IANA qui dépend de l'ICANN (américaine également). Elle est chargée d'attribuer des blocs d'adresses IP à différents registres régionaux (1 par continent), qui attribuent eux même des sous-ensembles aux registres locaux (la plupart du temps des opérateurs télécom), attribuant individuellement (à leurs clients) une ou plusieurs adresses.
Les adresses IPv4 sont constituées de 4 octets (32 bits), chaque octet ayant une valeur comprise entre 0 et 255 (exemple : 205.196.32.55). Le nombre d'adresses total est donc de ~4 milliards. Cela peut paraître énorme, mais aujourd'hui où tout le monde a un ou plusieurs appareils connectés en même temps, on arrive vite à saturation. Surtout qu'il faut également compter les adresses nécessaires pour les serveurs (web) et les objets connectés. Les adresses IPv6 sont elles composées de 8 octets (128 bits), amenant ainsi le nombre total à plus de 340 sextillions (ou 34 * 10^37). Elles ont une notation différente, utilisant l'hexadécimal en séparant les blocs de deux octets par ":" (exemple : 2003:e8:2705:ac00:15a5:4e85:fe11:47a3). Pour améliorer la lisibilité, on utilise une forme compressée où les 0 en tête sont supprimés (au niveau du second bloc e8 par exemple). On peut également fusionner tous les blocs avec des 0 consécutifs, comme sur cet exemple : 2a02:4780:12::28 qui correspond en réalité à 2a02:4780:0012:000:0000:0000:0000:0028. Malgré cette version condensée, elles restent pourtant beaucoup moins lisibles.
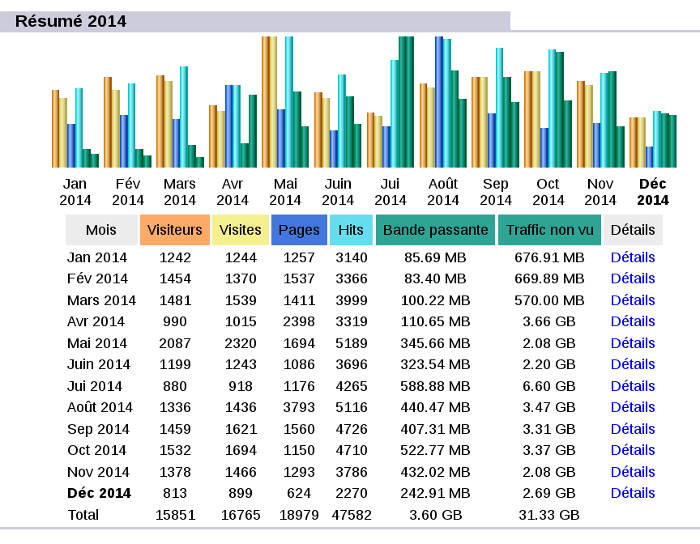
Alors pourquoi ne pas avoir basculé plus tôt ? Le matériel est compatible depuis de nombreuses années, néanmoins IPv6 n'est pas qu'une simple augmentation de la taille des adresses. La norme apporte également des fonctionnalités complexes à implémenter (cf la coupure réseau !). D'autant plus qu'il faut faire cohabiter les deux piles réseau sur un même système durant la phase de transition. Mais, face à la pénurie mondiale d'IPv4 et la pression des institutions, les opérateurs n'ont d'autres choix que de migrer (progressivement). D'après mes premières statistiques (1/2 mois), il y a environ 20% de connexions utilisant IPv6.
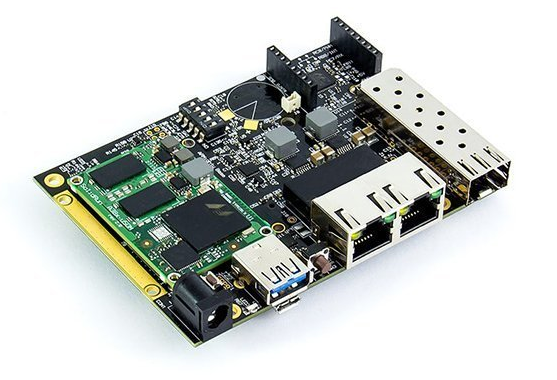
IPv6 sur une box Bouygues Telecom (sagem F@st5330b)
Par défaut, le trafic IPv6 entrant est bloqué par le routeur et ce, même si le pare-feu est désactivé. C'est une bonne mesure de protection, mais qui pourra poser problème quand on souhaite exposer des services sur le web. Voici la procédure complète pour ouvrir les ports pour un serveur GNU/Linux (on pourra également passer en politique "faible" pour tout exposer sur toutes les machines, mais cela reste dangereux) :
- Désactiver la délégation de préfixe sur la box
Activer le DHCPv6 sur son interface réseau (ici eth0), il faut ajouter une ligne au fichier /etc/network/interfaces :
iface eth0 inet6 dhcp
Redémarrer le serveur ou uniquement la partie réseau
sudo service networking restart
Attribuer une IP statique au serveur (n'est actuellement pas pris en compte)
Récupérer la nouvelle adresse
sudo dhclient -6 eth0
Vérifier que l'IPv6 du serveur correspond à celle de la configuration de la box
sudo ip a
Ajouter des règles de pare-feu pour tous les services à exposer (utiliser la fonctionnalité "dupliquer" pour aller plus vite)
- Configurer le serveur DNS en ajoutant une règle AAAA
- (Optionnel) Tester les règles via ce site
Mise à jour automatique du DNS Gandi
C'est un script que j'utilise depuis 5 ans. Le voici mis à jour pour supporter IPv6. Il est disponible ici
#!/usr/bin/env python3
#-*- encoding: utf-8 -*-
# This program is free software: you can redistribute it and/or modify
# it under the terms of the GNU General Public License as published by
# the Free Software Foundation, either version 3 of the License, or
# (at your option) any later version.
#
# This program is distributed in the hope that it will be useful,
# but WITHOUT ANY WARRANTY; without even the implied warranty of
# MERCHANTABILITY or FITNESS FOR A PARTICULAR PURPOSE.  See the
# GNU General Public License for more details.
#
# You should have received a copy of the GNU General Public License
# along with this program.  If not, see <http://www.gnu.org/licenses/>.

import requests
import json
import re
import socket

# Config
domain="soutade.fr"
API_KEY = "YOUR-KEY"
livedns_api = "https://dns.api.gandi.net/api/v5/"
dyndns_url = 'http://checkip.dyndns.com/'
headers = {
    'X-Api-Key': API_KEY,
}

A_RECORD_NAME="@" # Record of A type

def get_ipv6():
    s = socket.socket(socket.AF_INET6, socket.SOCK_DGRAM)
    # DNS Google
    s.connect(('2001:4860:4860::8888', 1))
    return s.getsockname()[0]

def get_ipv4():
    response = requests.get(dyndns_url)
    if response.ok:
        pattern = re.compile('[^:]*(\d+\.\d+\.\d+\.\d+)')
        result = pattern.search(response.text, 0)
        if result == None:
            print("No IP found")
            exit(1)
        else:
            return result.group(0).strip()
    # Bad gateway
    elif response.status_code in (502,504):
        exit(0)
    else:
        print("Connexion error")
        response.raise_for_status()
        exit(1)

def update_gandi_record(domain_records_href, target, current_ip):
    # Get recorded IP
    response = requests.get(f'{domain_records_href}/{A_RECORD_NAME}/{target}', headers=headers)

    if (response.ok):
        record = response.json()
    else:
        print("Failed to look for recorded IP")
        if response.status_code != 502: # Bad gateway
            response.raise_for_status()
        exit(1)

    print('Old IP : %s' % (record['rrset_values'][0]))

    if current_ip != record['rrset_values'][0]:
        record['rrset_values'][0] = current_ip

        # PUT new IP
        response = requests.put(f'{domain_records_href}/{A_RECORD_NAME}/{target}',
                                headers=headers, json=record)

        if (response.ok):
            print("IP updated")
        else:
            print("something went wrong")
            if response.status_code != 502: # Bad gateway
                response.raise_for_status()
            exit(1)

        return 34 # IP updated return !!
    return 0


# Get current IP
current_ip = get_ipv4()
print(f'Your Current IP is {current_ip}')

# Retrieve domains address
response = requests.get(livedns_api + "domains", headers=headers)
if (response.ok):
    domains = response.json()
else:
    if response.status_code != 502: # Bad gateway
        response.raise_for_status()
    exit(1)

domain_index = next((index for (index, d) in enumerate(domains) if d["fqdn"] == domain), None)

if domain_index == None:
    # domain not found
    print("The requested domain {domain} was not found in this gandi account")
    exit(1)

domain_records_href = domains[domain_index]["domain_records_href"]
ret = update_gandi_record(domain_records_href, 'A', current_ip)

current_ip = get_ipv6()
print(f'Your Current IP is {current_ip}')
domain_records_href = domains[domain_index]["domain_records_href"]
ret |= update_gandi_record(domain_records_href, 'AAAA', current_ip)

exit(ret)